Set up your upgraded yard
When you initialize N4 4.0.13 for the first time against a backup of an earlier version , the yard in the backup automatically becomes the active yard in the Yard Editor. Because Yard Editor does not permit the manipulation of an active yard, you must clone the active yard to manipulate your existing data in the visual GUI provided by the Yard Editor.
Although the data for yard.nyd is already being used in the active yard, the first time that you clone the active yard model after starting up against an earlier version's database backup, you also need to import the active yard.nyd file. Once you do this, the bin name tables for the active yard appear in the clone. You also have to import the yard.nyd for the active yard.
When you import a compiled yard file, N4 prompts you to reset the geometries for the imported yard model. If you accept the reset geometries option, N4 disregards the geometric information that is included in the yard file in favor of the geometries defined in Yard Editor.
In general, it is a good idea to reset the geometries, assuming that the geometric information provided in Yard Editor is more accurate. If you decide not to reset the geometries at the prompt, you can reset the geometries later.
Before you begin:
You may want to:
To set up your upgraded yard:
-
With XPS and the Bridge daemon shut down, paste your Yard Editor url (such as http://<N4 IP address:port>/apex/yard.zul) into your browser.
-
Log into Yard Editor using your N4 username and password.
-
In the Yard Models view right-click any yard model and click Add.
-
Complete the information in the Add Yard Model form.
-
Open Yard Editor and click Actions > Import Compiled Yard file. import the yard.nyd file for the yard model.
-
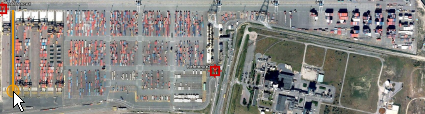
Import an image map of the yard (). For more information, see Tips for working with yard image maps (on page 1) and Import an image map of your yard (on page 1). Once the image is imported, the reference point tool appears.
If the image map does not appear after about 30 seconds, close the Yard Editor tab and reopen it.
If you need to reload the image map, do not reload a new image over one you previously imported. Instead, start over and create a new clone.
-
Click  (the Set Reference Point tool) to configure two reference points on the image map. For more information, see Import an image map of your yard (on page 1). When two reference points are configured, the
  , (the Draw Yard Perimeter tool) displays.
-
Click . On the map, draw the perimeter line by clicking an anchor point (sometimes, one of the reference points makes a good anchor point), and move clockwise or counter clockwise.
It is helpful to have the whole yard visible while drawing the perimeter. The orange circle that acts as the pointer turns corners when you click once, and remains engaged until you double-click the starting point.
Example: Anchor point in lower left corner
Drag and click at each corner to draw each leg of the perimeter, and then move on. N4 colors the designated area orange.
Example: Designated yard defined by orange filter
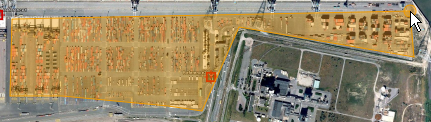
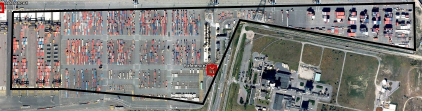
Complete the perimeter by double-clicking the initial anchor point. N4 replaces the orange markup with a solid black line.
Example: Completed perimeter
-
To place existing blocks
Decide which block to place; then, in Yard Editor, choose the appropriate tool. The tools available are:
-
 to add a stack block
-
 to add a non-stack block
-
 to add a track plan
-
 to add a berth
-
Locate the point on the image map for the lower left corner of the block that you intend to place. On the map, do one of the following:
-
For a stack block: Click the anchor point for the lower left corner of the block.
-
For a non-stack block or track plan: Click the map for the first anchor point; drag the pointer and click each anchor point of the block or track plan; double-click to finalize the outline.
-
For a berth: Click the map and, without releasing the mouse button, drag the pointer up and left or down and right to create the berth outline; release the mouse button to finalize the outline.
An Add new or Existing? dialog appears.
-
Choose Existing.
The Place <Element> form appears. Notice that a specific latitude and longitude for the point you clicked displays (view only) in the Place <Element> form. These attributes are editable later, with  (the Modify Yard Block tool).
-
In the Place <Element> form, in the Name field, click  to display the list of blocks that you imported from your yard file.
-
From the list, select the block to place.
-
Click Save.
A representation of the block displays on the image map; you can revise the size, shape and other block attributes later.
-
Right-click the block and select Edit Yard Block.
The Edit <Element> form (with the General, Display, Names, and Specs tabs) opens. The values that fill these fields are defined by the yard.nyd file that you imported. You can edit these as needed. Complete definitions and documentation for how to use these fields is in the Navis N4: Setup, Maintenance, and System Diagnostics Guide and the N4 online help.
-
For each of your yard elements (stack and non-stack blocks, berths, or track plans), repeat steps 6-12.
 Import New Map). For more information, see Tips for working with yard image maps (on page 1) and Import an image map of your yard (on page 1). Once the image is imported, the reference point tool appears.